Gnome Programming
While it is true that much of GNOME is written in C and most of the API is exposed through C bindings, you don't have to use C to write GNOME applications. Other languages, such as C++, Python, and Perl, enjoy a varying degree of support in GNOME. Perl may be the best-supported language (after C): Perl modules exist for Gtk+, Glade, and much of the GNOME API (including ORBit and GOAD). C++ and Python can work with the GNOME and Gtk+ API, but at the time of this writing, neither of them have specific support for GOAD (although there are Python bindings for ORBit, and GOAD support is probably not far off).
In this section, we're going to start with a simple introduction to Gtk+, and then work our way to some of the more interesting and useful parts of GNOME. Although alternatives to C exist for GNOME developers, we're going to look exclusively at C in this chapter. You'll be surprised how GTK+ and GNOME conspire together to make the sometimes tedious C language a little easier to deal with!
Using GTK+
If you've used GUI toolkits such as Tk or Java's AWT, you will probably be comfortable with GTK+, at least once you get over the shock of an object-oriented framework for C. Even if you haven't worked with similar toolkits, you should find GTK+ easy to learn.
With GTK+, it's easy to put a window on the screen and fill it with widgets. It's a little trickier to define how your application should behave when someone does something to a widget (such as closing a window or clicking a button). These behaviors are defined through signal handlers, which are functions that you define in your program (you will also see these handlers referred to as callbacks). After you define a signal handler, you use a GTK+ function to connect the signal handler to a widget. The effect of this is to give the widget a pointer to the function. When the widget detects an action, such as a button press, it invokes the signal handler function.
There are some basic things you need to do to write a single-screen GTK+ application (the line numbers after some list items correspond to the listing that follows):
Sketch out the design of your screen on a napkin or the back of an envelope. After we look at the Glade user interface builder, the napkin will become unnecessary.
Write a C program that includes the gtk/gtk.h include file. This include file pulls in all the GTK+ include files you could possibly need-it's one-stop shopping. [line 1]
Decide how you want the screen's widgets to react to user input. Define signal handlers for certain types of actions (such as clicking a button, closing a window, or selecting something from a menu). For now, we'll just write the function prototype for a signal handler and write the body of the signal handler in a later step. [lines 3-6]
Initialize GTK+ by calling gtk_init with argc (the count of command-line arguments) and argv (an array containing all command-line arguments). This enables GTK+ to look for command-line options that affect its behavior. [line 14]
Create a top-level container, such as a window. In this example, we create a GtkWindow using gtk_window_new with the GTK_WINDOW_TOPLEVEL argument (this tells GTK+ to create a window that is the top-level window of its application). After we create the window, we set its title with gtk_window_set_title. [lines 17-18]
Add some widgets to the window. In this example, we use gtk_label_new to create a text label containing the string "Hello, World." Then, we use gtk_container_add to add the label to the window. The GTK_CONTAINER() macro casts the window to a GTK+ container object (this is one example of how GTK+ fakes polymorphism: one of GtkWindow's parent classes is GtkContainer). [lines 21-22]
Connect the widgets to the corresponding signal handlers. In this example, we connect the window to the window_closed function, which handles a user request to close the window (such an event can be initiated by clicking on the window close control). [lines 25-28]
Show the window and its widgets with gtk_widget_show_all(). [line 31]
Start the GTK+ event loop with gtk_main(). During this event loop, the execution of the program stops on this line. However, if an event is triggered, the event's signal handler is invoked (after which control returns to the main loop). [line 34]
Next, we'll write the functions for the signal handler. In this example, when someone closes the window, it calls the gtk_main_quit() function, which shuts down the loop we started on line 34. Execution continues after the call to gtk_main(). The return FALSE statement is a signal to the GTK+ system that it's OK to remove the window (if we returned TRUE, the window would remain on-screen). [lines 42-52]
Here is the source code for gtk_hello.c:
 1  #include <gtk/gtk.h>
 2
 3  /* Function prototype for signal handler */
 4  static gint window_closed(GtkWidget*   w,
 5                            GdkEventAny* e,
 6                            gpointer     data);
 7
 8  int main(int argc, char* argv[]) {
 9
10      GtkWidget* window;   /* a Window */
11      GtkWidget* label;    /* a label  */
12
13      /* Initialize GTK+ */
14      gtk_init(&argc, &argv);
15
16      /* Create the window  */
17      window = gtk_window_new(GTK_WINDOW_TOPLEVEL);
18      gtk_window_set_title(GTK_WINDOW(window), "Hello App");
19
20      /* Add some text */
21      label = gtk_label_new("Hello, World.");
22      gtk_container_add(GTK_CONTAINER(window), label);
23
24      /* Set up the event handler */
25      gtk_signal_connect(GTK_OBJECT(window),
26                         "delete_event",
27                         GTK_SIGNAL_FUNC(window_closed),
28                         NULL);
29
30      /* Show the window and its widget */
31      gtk_widget_show_all(window);
32
33      /* Initiate the event loop */
34      gtk_main();
35
36      /* exit the program */
37      return 0;
38
39  }
40
41  /* Event handler for window closed */
42  static gint window_closed(GtkWidget*   w,
43                            GdkEventAny* e,
44                            gpointer data)
45  {
46
47      /* Terminate the event loop, then tell
48       * GTK+ it's OK to delete the window
49       */
50      gtk_main_quit();
51      return FALSE;
52 } |
Compiling and Running the GTK+ Example
It's very easy to compile the GTK+ example. The gtk-config utility can help you set the C and linker flags using the --cflags and --libs options. Here are the contents of a Makefile that can compile the example program:
gtk_hello: gtk_hello.c
    $(CC) $(CFLAGS) `gtk-config --cflags` \
-o $@ $< `gtk-config --libs` |
Use the cd command to change to the gtk_hello subdirectory under the ch13 example directory (you can get the example programs at www.wiley.com/compbooks/jepson). Then, run the make utility and run the gtk_hello program that gets created:
bash-2.03$ cd ch13/gtk_hello/ bash-2.03$ make cc `gtk-config --cflags` \ -o gtk_hello gtk_hello.c `gtk-config --libs` bash-2.03$ ./gtk_hello |
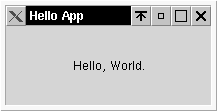
Figure 1-2 shows this example in action.
GTK+ versus OO Toolkits
Feature for feature, GTK+ compares very well with object-oriented graphical toolkits like Java's AWT. But how does it differ? Let's take a quick look:
- Use macros for explicit casts
In an object-oriented language, such as Java, polymorphism is handled automatically. For example, the java.awt.Frame class (a top-level window class in Java's AWT) is a subclass of the java.awt.Container class (which can contain other objects). If you have a Frame called myFrame, you can invoke Container's add() method with:
myFrame.add(myWidget);
and Java traverses the inheritance tree to find the add() method in java.awt.Container. GTK+, on the other hand, can't do this, because C does not support OO constructs such as polymorphism. Instead, you need to convert a GtkWindow object to a GtkContainer object with the GTK_CONTAINER macro (this is essentially an explicit cast):
GTK_CONTAINER(window);
GTK+ supplies similar macros for all widgets and objects in the hierarchy.
- No object methods
C does not support encapsulating behavior within objects, so you can't invoke a window.add() method. Instead, you need to call a function (gtk_container_add) that takes a container and a widget as an argument:
gtk_container_add(GTK_CONTAINER(window), label);
- Namespaces
C does not support the notion of namespaces. For example, in a language like Perl, you might create a new Window with:
$window = new Gtk::Window();
In C, however, you must say:
window = gtk_window_new();
In Perl, the :: functioned as a qualifier that separates namespaces: the new() method resides in the Window namespace, which resides in the Gtk namespace. In C, the _ replaces the ::, and separates identifiers-there is no implication that a method called new() exists in a separate package. All identifiers live in the same namespace, and the gtk_window component of the name is an attempt to ensure that the function name is completely unique.
GTK+ Widgets
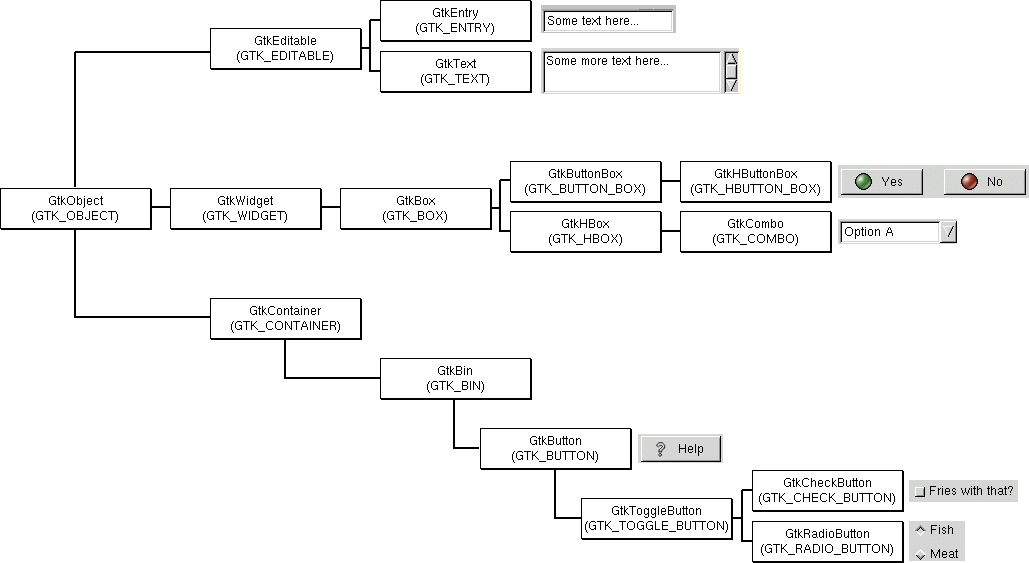
There are many widgets in GTK+ that you can choose from: buttons, text areas, and windows. Figure 1-3 shows just a few of these widgets, as well as their parent classes in the inheritance tree.
Developing User Interfaces with Glade
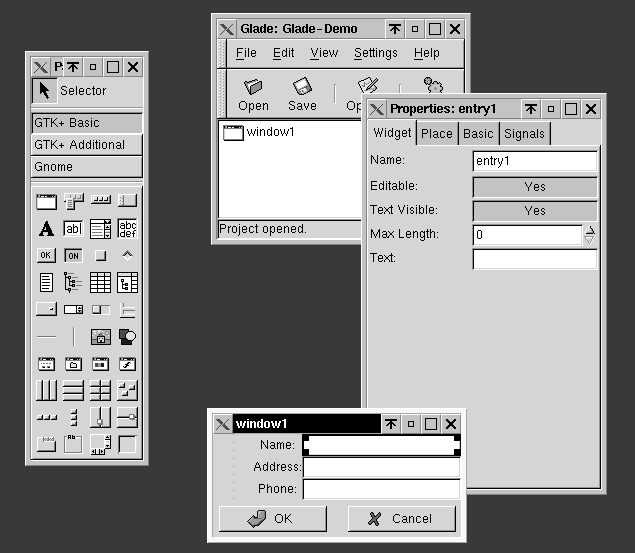
Glade is a user interface builder for GTK+ and GNOME. Glade is similar to commercial GUI builders in that you select a widget from a palette, and interactively draw the screen. Figure 1-4 shows Glade in action (the screen titled window1 is a simple window I built with Glade).
You can find Glade in many Linux distributions, or you can visit the Glade home page at http://glade.pn.org for downloads and more information.
Glade uses a simple XML file format to specify the screen layout. It's so simple that you can edit these XML files directly (although the easiest way to deal with them is through the Glade program itself). Although Glade can generate code that uses the widget definitions, the libglade library makes it very easy to use these XML screen definitions directly in your own programs. We'll look at both approaches in this chapter, and you can decide what is best for your needs when it comes time to build your own programs.
Here are some characteristics of a .glade file:
- Hierarchical organization
Every widget in a glade file is enclosed within a <widget> element. Widgets can contain other widgets, so we can have nested widgets, as in the following, which defines a label within a window:
	<widget>
	    <class>GtkWindow</class>
	    <widget>
	        <class>GtkLabel</class>
	    </widget>
	</widget>
- Named signal handlers
You can specify signal handlers for your widgets:
	    <Signal>
	        <name>delete_event</name>
	        <handler>window_closed</handler>
	    </Signal>
Then, all you need to do is write the signal handlers and invoke the glade_xml_signal_autoconnect() method, as we'll see in the following example.
- Exposes lots of the GTK+ API
The XML format that Glade uses supports a lot of the GTK+ API. For example, you can specify the name of an item, its label, type, and other properties. This eliminates the need for you to set these properties in your programs.
The following example, simple.glade, shows these characteristics. Here is the Glade source for simple.glade:
1 <?xml version="1.0"?> 2 <GTK-Interface> 3 4 <widget> 5 6 <class>GtkWindow</class> 7 <name>MainWindow</name> 8 <title>Hello App</title> 9 <type>GTK_WINDOW_TOPLEVEL</type> 10 <Signal> 11 <name>delete_event</name> 12 <handler>window_closed</handler> 13 </Signal> 14 15 <widget> 16 <class>GtkLabel</class> 17 <name>label</name> 18 <label>Hello, World</label> 19 </widget> 20 21 </widget> 22 23 </GTK-Interface> |
Here is an explanation of what's going on in various places:
- Line 1
We start out the .glade file with a directive that states the version of XML that's in use (you'll see something like this in every well-formed XML document).
- Lines 2 and 23
The entire user interface is enclosed in a <GTK-Interface> element.
- Lines 4, 6, and 21
The outermost widget is a GtkWindow.
- Lines 7-9
That window is named MainWindow, its title is set to "Hello App," and its type is set to GTK_WINDOW_TOPLEVEL.
- Lines 10-13
A signal handler is defined to react to someone closing the window.
- Lines 15-19
A label is added to the window with the text "Hello, World."
As with the GTK+ application we saw earlier, there are some basic things you need to do to write an application that uses a Glade XML file (the line numbers in this list correspond to the file that follows):
Include the gtk/gtk.h and glade/glade.h include files. These files pull in all the other includes you'll need for the program. [lines 1-2]
As with the GTK+ example, define function prototypes for any signal handlers you have. [lines 4-9]
Define a GladeXML variable, xml, to hold the contents of the XML file. [line 13]
As with the GTK+ example, we call gtk_init() with argc and argv. [line 16]
Initialize the glade libraries by calling glade_init(). [line 19]
Use glade_xml_new() to read the contents of simple.glade, and store the contents in the variable xml. [line 22]
Next, we'll hook all the signal definitions in the simple.glade file up to the signal handlers in the program by calling glade_xml_signal_autoconnect(). In this example, it connects the window_closed signal handler to the MainWindow widget. [line 25]
As with the GTK+ example, we start the main loop. [line 28]
As with the GTK+ example, the code for the signal handlers appear at the end of the source listing. [lines 35-45]
Next, here is the source code for this example:
 1  #include <gtk/gtk.h>
 2  #include <glade/glade.h>
 3
 4  /* Signal handler for when the user closes
 5   * the window.
 6   */
 7  gint window_closed(GtkWidget*   w,
 8                     GdkEventAny* e,
 9                     gpointer     data);
10
11  int main(int argc, char* argv[]) {
12
13     GladeXML *xml; /* an XML document */
14
15     /* Initialize GTK+ */
16     gtk_init(&argc, &argv);
17
18     /* Initialize Glade */
19     glade_init();
20
21     /* Load the UI definition from the file */
22     xml = glade_xml_new("simple.glade", NULL);
23
24     /* Connect the signals that are defined in the file */
25     glade_xml_signal_autoconnect(xml);
26
27     /* Enter the main GTK+ loop */
28     gtk_main();
29
30     /* Exit the application */
31     return 0;
32
33  }
34
35  /* Event handler for window closed */
36  gint window_closed(GtkWidget*   w,
37                     GdkEventAny* e,
38                     gpointer data)
39  {
40     /* Terminate the event loop, then tell
41      * GTK+ it's OK to delete the window
42      */
43     gtk_main_quit();
44     return FALSE;
45 } |
This code produces a window that is identical to the one shown earlier in Figure 13.2. The code is different from the GTK+ example, but the application is more extensible. By separating the layout from the behavior, it's possible to customize this program without having to recompile.
Glade Tutorial
This tutorial introduces the use of the Glade user interface builder. There are three steps that we'll look at: Build the User Interface, Generate the Source Code, and Compile and Run the Application.
Stage One: Build the User Interface
First, let's build the interface with Glade. This will create an XML file that contains all the widgets we define. Here are the steps needed to build our sample user interface:
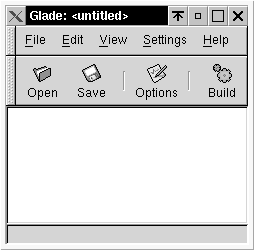
Run Glade. Start the X Window System, open a shell, and then execute the command glade. A blank project should appear as shown in Figure 1-5.
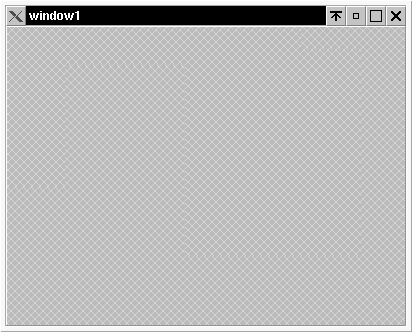
Create a window. Select the Palette window and click the Window widget (if you hover your mouse over each widget, a tooltip appears with the name of the widget). An empty window appears, as shown in Figure 1-6.
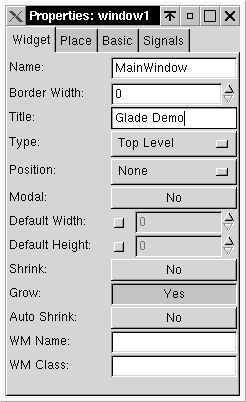
Name and label the window. Select the Window object and locate the Properties window. On the Widget tab, change the Name (the name of the widget for programming purposes) to read MainWindow, and the Title (the window title that the end user sees) to read "Glade Demo", as shown in Figure 1-7.
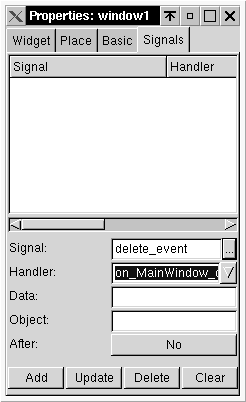
Add a signal handler to the window. Select the Window object and locate the Properties window. On the tab labeled Signals, select the "..." button next to the Signal field. The Select Signal dialog appears. Scroll down to GtkWidget Signals and choose delete_event, then click OK. This creates a reference to a default signal handler name that we'll create later (see Figure 1-8). Click Add to add the signal handler.
Partition the window into two regions. We'll use a layout widget to create two regions: one for user input widgets, and another for buttons. From the Palette window, select the Vertical Box widget and then click in the window. Choose two rows and click OK. The window should now look as it did in Figure 1-6, except there will be a thin horizontal line in the center of the window.
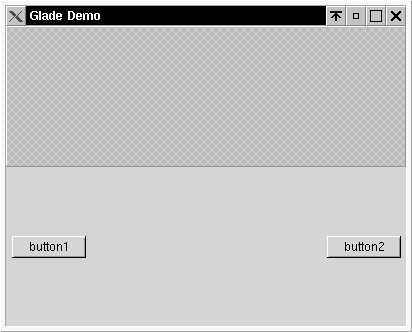
Add a row of buttons. From the Palette window, select the Horizontal Button Box (not the Horizontal Box) widget and click in the lower box of the window. Choose two columns and click OK. The window should look similar to Figure 1-9.
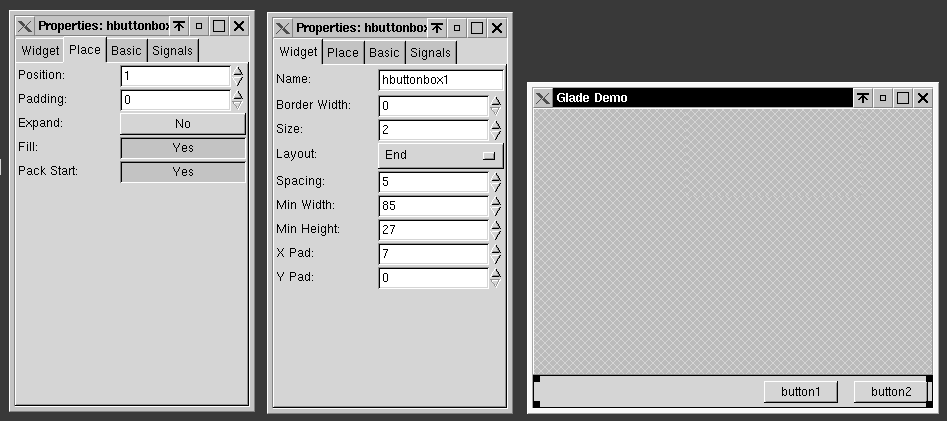
Pack the buttons snugly. Click on the button box (the region surrounding the two buttons, not the buttons themselves) and then locate the Properties window. On the Properties window Widget tab, set Layout to "End," and Spacing to "5." On the Properties window Place tab, set Expand to "No". (See Figure 1-10)
Assign labels and Names to the Buttons. Select the leftmost button, and then select the Properties window. On the Properties window Widget tab, select OK from the Stock Button pop-up menu. Then, change the Name field to ok_button. Select the rightmost button, and then select Cancel from the Stock Button pop-up menu. Change the Name field to cancel_button.
Add signal handlers to each button. Select the OK button, and then select the Signals tab of the Properties window. Click the button labeled "..." that is next to the field labeled Signal. Choose "clicked" from the GTK Button signals section and click OK. The handler name is automatically set to on_ok_button_clicked (or on_cancel_button_clicked). Click Add to add the signal handler (don't forget this step, or the signal handler won't be added). Do the same for the Cancel button.
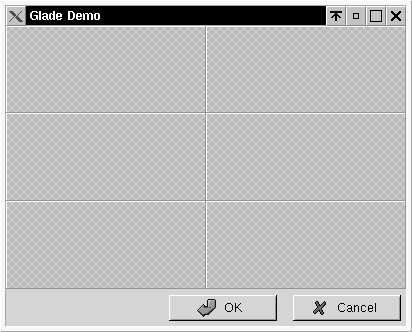
Add a table layout widget. We'll add a table to the window so we can insert some evenly spaced fields and labels. Select the Table widget and click in the top region of the window. Choose three rows and two columns and click OK. (Figure 1-11 shows how the window is shaping up.)
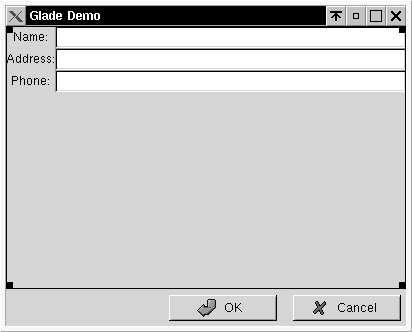
Add labels to each row. Let's put some labels in the leftmost columns (these will be the prompts for some input fields). For each label, select the Label widget and then click the leftmost column of each row. Select each label and use the Widget tab of the Properties window to set each label's Label property to "Name:", "Address:", and "Phone:". (See Figure 1-12)
Add text entry fields to each row. Next, we'll put some text entry fields in the rightmost columns. For each text field, select the Text Entry widget and click the rightmost column of each row. Select each field and use the Widget tab of the Properties window to set each text field's name property to entryName, entryAddress, and entryPhone. (See Figure 1-12)
Save the project. We're almost done! Locate the main Glade window (it should be called Glade: <untitled>) and select Save from the File menu. Change the project name to GladeDemo. Before you click OK, make sure you take note of the Project Directory field; you can choose a different directory if you'd like. On the General tab, make sure Language is set to C, then click OK to save the project.
Now we're done with the user interface, don't close Glade just yet, because we'll need it in the next stage.
Stage Two: Generate Source Code
Next, we'll generate the source code. This step creates a whole bunch of files, including files that automate the compilation of your application. After we generate the source code, we'll edit some of the source files to add the behavior we need for this application. Here are the steps you must take to generate and edit the source code:
Build source code. To generate the source code, select the main Glade window. At this point, it should be called Glade: GladeDemo. Select Build Source Code from the File menu. In a few seconds (or less), you should see a status message that states "Source code written." You may notice that there are a lot of files in the project directory. Table 1-1 lists some of the important ones.
Table 1-1. Files Generated by Glade
Filename Description AUTHORS Information about the authors of the program. You should put your contact information in here, at least. ChangeLog A log of changes made over time. It's up to you to put an entry in this file whenever you make a significant change. NEWS Use this file to put any major changes or news items you want your users to know about. autogen.sh Run this file to generate a configure script (see Stage Three, Compile and Run the Application). gladedemo.glade This is the Glade XML file. src/callbacks.c, src/callbacks.h This is where your signal handlers go. src/interface.c, src/interface.h Instead of reading the .glade file at run-time, your application will load the user interface that is defined in this file. Don't edit it, though, since it is automatically generated by Glade when you change or add a widget. src/main.c The main program. You can edit this if you need to. src/support.c, src/support.h Support functions that your application will use. This includes the lookup_widget() function. Change working directory. Use the cd command to change to the src subdirectory of the project directory (see Save the Project in the previous section-you should have made a note of this directory).
Write the delete_event signal handler. Next, we need to write a signal handler for the main window's delete event. Open the src/callbacks.c file in your favorite editor. This file contains all the signal definitions that we'll write. Scroll down until you find the definition of the following function:
gboolean
on_MainWindow_delete_event (GtkWidget       *widget,
                            GdkEvent        *event,
                            gpointer         user_data)
{

  return FALSE;
}
This should look similar to the signal handlers we used in previous examples. We want to exit the application when a user clicks the close control, so change it to read:
gboolean
on_MainWindow_delete_event (GtkWidget       *widget,
                            GdkEvent        *event,
                            gpointer         user_data)
{
  gtk_main_quit();
  return FALSE;
}
Don't close callbacks.c yet-we need to make two more changes.
Write Cancel signal handler. Scroll down until you find the signal handler for the Cancel button:
void
on_cancel_button_clicked (GtkButton       *button,
                          gpointer         user_data)
{

}
We want the Cancel button to quit the application, so change this code to read:
void
on_cancel_button_clicked (GtkButton       *button,
                          gpointer         user_data)
{
  gtk_main_quit();
}
Write OK signal handler. Here's where things get a little different from our previous examples. In this signal handler, we're going to look up the text entry fields and read their current contents. To do this, we use the lookup_widget function, which is only available in applications generated with Glade (it's in the generated file support.c), it is not part of libglade. Here is the default handler:
void
on_ok_button_clicked                   (GtkButton       *button,
                                        gpointer         user_data)
{

}
Here's what you should change this code to look like (line numbers begin at the top of the function here, not the top of the program source file):
 1  void
 2  on_ok_button_clicked (GtkButton       *button,
 3                        gpointer         user_data)
 4  {
 5
 6    /* Define each widget. */
 7    GtkWidget *entryName, *entryAddress, *entryPhone;
 8
 9    /* Define strings to hold each widget's value */
10    gchar *name, *address, *phone;
11
12    /* Look up each widget */
13    entryName    = lookup_widget(GTK_WIDGET(button),
14                                 "entryName");
15    entryAddress = lookup_widget(GTK_WIDGET(button),
16                                 "entryAddress");
17    entryPhone   = lookup_widget(GTK_WIDGET(button),
18                                 "entryPhone");
19
20    /* Fetch the value of each widget */
21    name    = gtk_entry_get_text(GTK_ENTRY(entryName));
22    address = gtk_entry_get_text(GTK_ENTRY(entryAddress));
23    phone   = gtk_entry_get_text(GTK_ENTRY(entryPhone));
24
25    /* Print the name, address, and phone number */
26    g_print("Name: %s\n",    name);
27    g_print("Address: %s\n", address);
28    g_print("Phone: %s\n",   phone);
29
30    /* Exit the application */
31    gtk_main_quit();
32
33  }
Let's look at what this code does, step by step:
Line 7. Define local variables to hold references to the name, address, and phone number widgets.
Line 10. Define strings that we'll store the current text of those widgets in.
Lines 12-18. Because we don't have any global references to the name, address, or phone number widgets, we need some way of locating them. Glade provides a lookup_widget() method that is very useful. Simply pass it any widget on the form, and the name of the widget you are interested in, and it will find that widget for you. Because we're in the event handler for the OK button, we get a reference to that widget in the pointer *button. So, to find entryName, entryAddress, or entryPhone, we just pass button and the name of each widget to lookup_widget(), and it returns the widget we want.
Lines 21-23. Next, we use the gtk_entry_get_text() method to get the current string that each widget holds. Note that we cast each widget using the GTK_ENTRY macro, because that method needs a GtkEntry object as an argument, and each widget is currently represented as a GtkWidget object. Again, this is one of the macros that helps GTK+ implement polymorphism.
Lines 26-28. Now, we simply use glib's g_print function to print out the current value of the name, address, and phone number. If this were a database application, we might store those values in a database table.
Line 31. We're all done here, so we call gtk_main_quit(), which terminates the GTK+ event loop.
Review callback.c. Here is a complete listing for callback.c, after all our changes:
#ifdef HAVE_CONFIG_H
#  include <config.h>
#endif

#include <gnome.h>

#include "callbacks.h"
#include "interface.h"
#include "support.h"

void
on_ok_button_clicked (GtkButton       *button,
                      gpointer         user_data)
{

  /* Define each widget. */
  GtkWidget *entryName, *entryAddress, *entryPhone;

  /* Define strings to hold each widget's value */
  gchar *name, *address, *phone;

  /* Look up each widget */
  entryName    = lookup_widget(GTK_WIDGET(button),
                               "entryName");
  entryAddress = lookup_widget(GTK_WIDGET(button),
                               "entryAddress");
  entryPhone   = lookup_widget(GTK_WIDGET(button),
                               "entryPhone");

  /* Fetch the value of each widget */
  name    = gtk_entry_get_text(GTK_ENTRY(entryName));
  address = gtk_entry_get_text(GTK_ENTRY(entryAddress));
  phone   = gtk_entry_get_text(GTK_ENTRY(entryPhone));

  /* Print the name, address, and phone number */
  g_print("Name: %s\n",    name);
  g_print("Address: %s\n", address);
  g_print("Phone: %s\n",   phone);

  /* Exit the application */
  gtk_main_quit();

}

void
on_cancel_button_clicked (GtkButton       *button,
                          gpointer         user_data)
{
  gtk_main_quit();
}

gboolean
on_MainWindow_delete_event (GtkWidget       *widget,
                            GdkEvent        *event,
                            gpointer         user_data)
{
  gtk_main_quit();
  return FALSE;
}
